Conseils pour alimenter un Lifter
Advices for Powering a Lifter
par Claude Dupré ( France
Conseils pour alimenter
un Lifter
Advices for
Powering a Lifter
par
Claude Dupré ( France ![]() )
)
created on
January 11, 2002 - JLN Labs -
Last update January 12, 2002
All informations in this page are published free and
are intended for private/educational purposes and not for
commercial applications
( ![]() English version )
English version )
Salut à vous !
Bonne Année, sans gravité...
Ci-joint un document explicatif sur la méthode pour alimenter un
Lifter en partant d'une THT d'un moniteur.
Soyez prudent avec la haute tension !
Faîtes-nous part de vos expériences.
Cordiales salutations,
Claude Dupré
Quelques conseils
pour alimenter un Lifter :
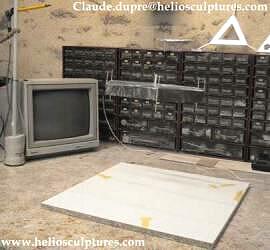
Pour récupérer la THT d'un moniteur, c'est très simple, mais
il faut prendre certaines précautions.
La puissance totale délivrée par une THT n'est pas mortelle,
mais le cœur humain n'apprécie pas de tel choc.
Cardiaque, s'abstenir de prendre de la haute tension! Donc pour
la sécurité, il vaudra mieux pratiquer deux trous dans le
moniteur et refermer le capot avant utilisation...
Il est bon de mettre une affichette de "DANGER
THT"
1) S'assurer qu'il délivre au moins 25KV / 20W (voir plaque)
2) Démonter proprement le capot arrière du moniteur
3) Le - : c'est la tresse qui entoure le tube cathodique
4) Le + : c'est la tétine qui plonge dans la partie supérieure
du tube
5) Pratiquer 2 encoches opposées, une à gauche, une à droite,
dans le capot (10mm x 5mm) à environ 10cm de la base, à
l'endroit de la jonction du capot arrière et du cache (tube)
avant.
6) Souder deux fils de 2m bien isolés sur la tresse (-)
entourant le tube, ici la section a peu d'importance 10 à
20/10ème suffit
7) Sortir, tel qu'il est, le fil qui alimente la tétine (+) à
l'opposé
8) Refermer le capot, les fils passés par les encoches g. et d.
pratiquées
9) Le fil - peut reposer simplement sur le plan de travail
10) Couper le fil + à 5cm de la tétine et mettre en série une
résistance d'environ 250 K Ohm 3W pour éviter de griller la THT
en cas de court-circuit (fréquents)
11) Isoler fils et résistance(s) avec 4 ou 5 couches de scotch
orange de type utilisé pour assembler l'isolation en laine de
verre
12) Elever et fixer la tétine, à l'aide d'un support très
stable, à 50cm de hauteur (j'ai utiliser une bouteille emplie de
sable et un tube de 16mm en PVC d'isolation électrique)
13) Préparer une base de travail plane de 80x80cm pour le
Lifter, genre aggloméré stratifié blanc 15 à 22mm (non
humide)
14) Fixer au scotch l'extrémité dénudée sur 3mm et étamée,
d'un des fils - sur un des côtés de la base
15) L'extrémité de l'autre fil - sera raccordée à une pointe
de touche bien isolée, qui sera éloignée de tout autre
conducteurs, objets ou humains (il servira à décharger la THT
après utilisation)
16) Souder sur cette extrémité (-) dénudée un fil de cuivre
émaillé de 10/10ème, long. 70cm, dont l'autre extrémité
(dénudée sur 2cm) sera collée à la bande aluminium du Lifter
au scotch fin
17) La tétine surélevée sera placée à l'opposé de la base
(30cm)
18) Souder un fil émaillé 10/10ème de 70cm sur l'électrode de
la tétine, l'autre extrémité sera soudée au fil Corona du
Lifter
19) Avant essai, débarrasser la table et la base de travail
21) Amener la prise d'alimentation secteur du moniteur vers une
nourrice avec interrupteur afin de pouvoir mettre sous et hors
tension le système tout en restant éloigné d'au moins 1m
minimum
22) Le lieu d'expérience ne doit pas être humide
23) Tenir les éventuels observateurs à 3m minimum
24) décollage !
25) Après mise hors tension du moniteur, toujours décharger la
THT avec la pointe de touche (-) en la mettant en contact avec la
soudure sur la tétine (+). Ne jamais toucher le Lifter avant de
décharger la THT
26) Réjouissez-vous, mais Prudence ! Toujours...
| ATTENTION !!!, Faites preuve d'une extrême prudence, Vous manipulez ici de la Haute-Tension, TOUJOURS arrêter puis déconnecter votre appareil ( le moniteur ) et décharger la sortie Haute Tension à travers une résistance de 10Kohms/2W avant toute manipulation.. Les plans et les conseils présentés ici, ne sont pas destinés à des débutants. Vous devrez procéder avec soin et prudence et avoir l'habitude de manipuler de la Haute-Tension avant d'envisager une telle expérience ! Si vous décider de réaliser cette expérience, ceci est à votre propre risque et je décline toute responsabilité en ce qui concerne les éventuels dommages matériels ou physiques causés. |
( ![]() English translation courtesy of Mike
Ady )
English translation courtesy of Mike
Ady )
Greetings to you!
Have a happy New Year, "without gravity"
I have enclosed an explanatory document on how to use the high
voltage from a monitor to supply power to a Lifter.
Be cautious around high voltage!
Share your experiences.
Cordial greetings,
Claude Dupré
Some advices for providing
power to a Lifter :
It is very simple to obtain high voltage from a monitor,
but it is necessary to take certain precautions. The total power
delivered by the HV circuit of a monitor is not fatal, but the
human heart does not appreciate such a shock. Therefore it is
safer to place two holes in the monitor and close the cover
before using... It is also a good idea to affix a label marked
"DANGER HIGH VOLTAGE"
1) Make sure that the monitor delivers at least 25KV at 20W (see
plate)
2) Remove the rear cover of the monitor
3) The - : this is the braid or mount that surrounds the picture
tube
4) The + : this is the rubber nipple that attaches to the picture
tube. [ Squeeze the rubber nipple with your fingers or a pair of
pliers to remove it from the picture tube. Make sure the
monitor has been turned off for at least a day before attempting
this.]
5) Make 2 notches on opposite sides of the cover... one on the
left and the other on the right, (10 mm x 5 mm) about 10 cm from
the bottom, at the junction of the cover in back and screen in
front.
6) Solder two 2 m [7'] pieces of well insulated wire to the braid
(-) surrounding the picture tube, and run them out one of the
notches. [These will be the ground wires.] Here the wire
diameter is not critical... 0.1 or 0.2 mm [38 or 32 AWG] is fine.
7) Run the wire with the rubber nipple (+) out the other side.
8) Close the cover, making sure the wires run through the notches
on either side
9) The wire can simply rest on the work surface.
10) Cut and strip the wire (+), 5 cm from the rubber nipple and
put a 250 K Ohm 3W power resistor (or equivalent) in line, (to
avoid frying the HV circuitry in case of a short circuit).
11) Insulate the wires and resistor(s) with 4 or 5 layers of
orange Scotch tape of the type used to install fibreglas
insulation.
12) Attach the rubber nipple to a very stable support, raising it
to a height of 50 cm. (I used a bottle filled with sand and a
length of 16 mm PVC electric insulation tube [plastic electrical
conduit])
13) Make a 80x80 cm work surface for flying the Lifter, using
white [surfaced] chipboard, 15 to 22 mm [1/2" to 3/4"]
thick (make sure the wood is dry, not damp)
14) Strip (3 mm) of insulation from the end of one of the ground
wires (-) and tin it [with solder]. Tape it to one of the sides
of the work surface.
15) The end of the other ground wire (-) is to be connected to a
well isolated discharge probe, which is to be kept away from all
other conductors, objects or humans (it will serve to discharge
the high voltage after each use).
16) Strip the end of this wire (-) and solder it to the end of 70
cm length of 0.1 mm [38 AWG] insulated copper magnet wire.
Remove 2 cm of insulation from the other end of the wire. This
end is to be taped to the aluminum plate of the Lifter using
ordinary Scotch tape.
17) The elevated rubber nipple is to be placed on the opposite
side of the work surface (30 cm)
18) Solder a 70 cm length of 0.1 mm [38 AWG] enameled copper
magnet wire to the electrode inside the rubber nipple. The
other end is to be soldered to the Lifter corona wire.
19) Before testing, remove everything from the table and the work
surface.
21) Provide switched (mains) power to the monitor. It is
important to be able to turn off the power while remaining at
least 1 m [3'] from the high voltage.
22) The test location must not be humid
23) Make sure casual observers are kept back a minimum of 3 m
[10'].
24) Launch!
25) After switching off the power to the monitor, always
discharge the high voltage with discharge probe (-) by placing it
in contact with the electrode inside the rubber nipple (+). Never
touch the Lifter before discharging the high voltage.
26) Enjoy, but Keep safe.
| BE CAREFUL, USE EXTREME CAUTION !!!, this device use High Voltage, ALWAYS switch off the input and discharge the output to the ground through 10k/2W resistor before touch it. These plans are not intended for the inexperienced. User of this document should be very carefull and experienced in High-Voltage electronics to try anything out ! If you do it the risk of any results is just yours. I take no responsibility of anything that might happen. |

Plan
et détails de construction du Lifter HCD-03 de Claude Dupré
How
to build the Claude Dupré's Lifter HCD-03
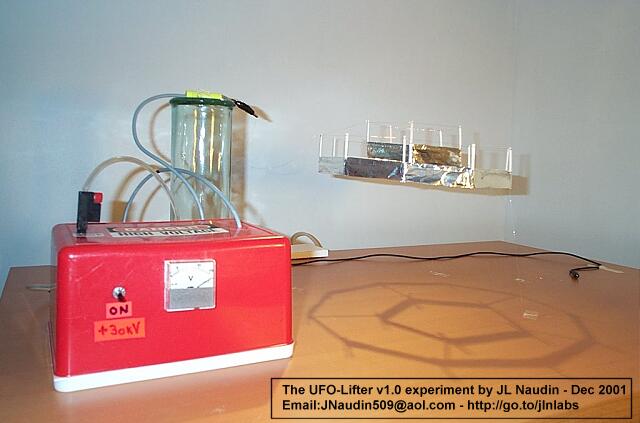
The UFO-Lifter v1.0 works very well with a simple 30KV
power supply ( see the details and diagram
)
See also the :
 Lifters builders
and tests feed-back
Lifters builders
and tests feed-back ![]()
Return to the Lifters Builders page